
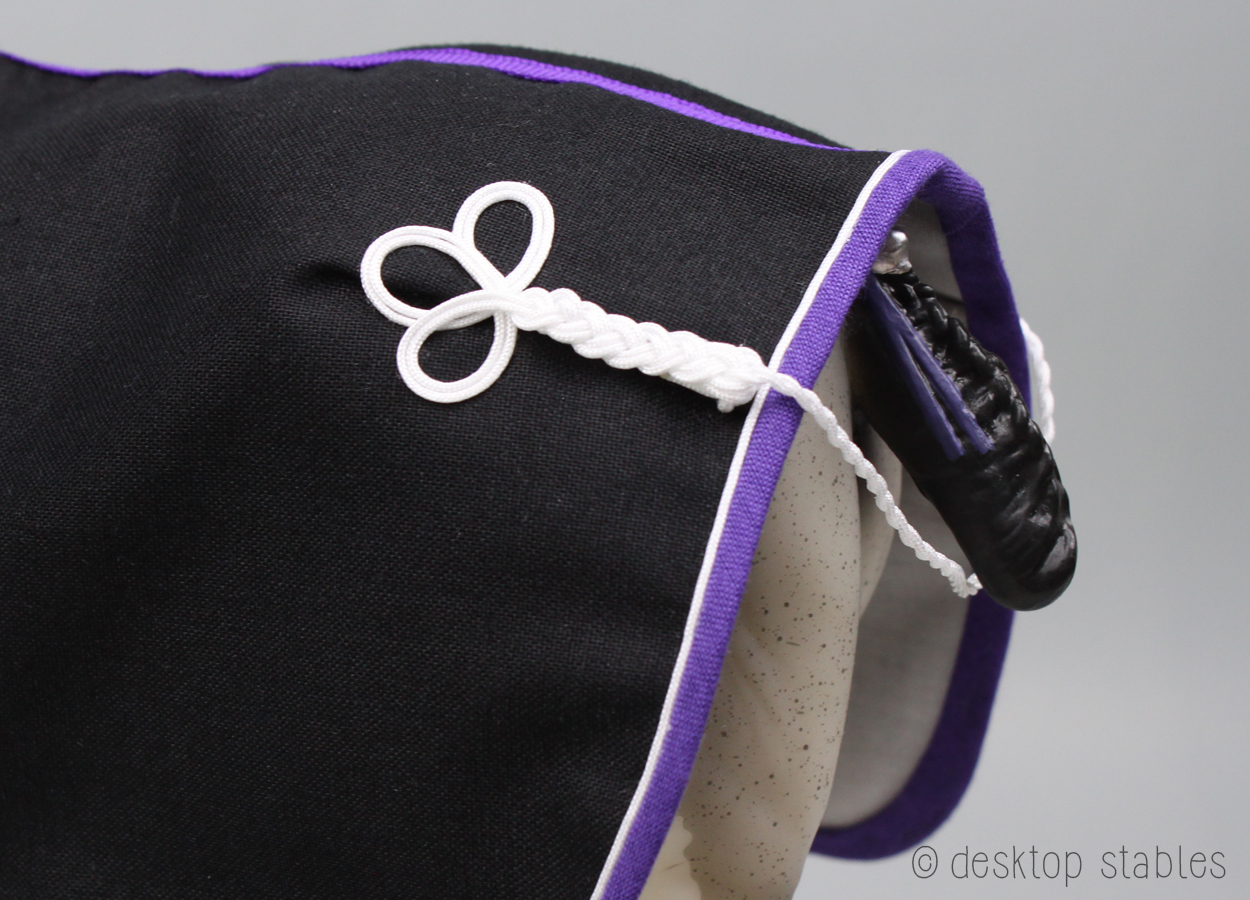
Hip ornaments are the fancy braids often seen on dress sheets, like this one here. It took me a while to figure out how to imitate these in miniature, and while it’s not hard to do, it is very fiddly. You have been warned!
I use 0.8MM nylon cord for these, which I’ve purchased from this seller on Etsy. (it also makes good piping and rope halters) I’ve seen similar cording available in craft stores, near the beads and jewelry supplies.
For glue, I use both Aleene’s Tacky glue and Fabri-Tac. Fabri-Tac has a quick drying time and holds the slippery cords together better. I use Aleene’s to secure the loops to the fabric, as it has more working time and is easier to move into tight spots. I’ll also use a lighter to seal the cut ends if needed, but that’s totally optional.
We’ll be starting with the loops first. For each loop, cut 2 pieces of cord, 5-6 inches long. I like to glue the cords together on one end to help keep them in place.

On this sheet, I wanted the braids to be an inch long. They’ll go directly over my hip darts to cover the stitching. The ruler is called a seam gauge. The blue piece slides up and down which makes remembering specific measurements easy.

I start by gluing the cords down. I’ll position these a little lower than an inch, as they will be covered up later.

Form one loop on the right. (you could draw the loops in first with chalk if that would help) It’s kind of tricky to get the cords to stay lined up together. I usually form the loop first and keep it pressed down with a finger, then use a stylus or pointy tool to gently lift the loop and add small amounts of tacky glue underneath. I mostly want to tack it down at this point, and once the glue has set, I’ll go back and stick more underneath as needed.
Less is more! You don’t want gobs of glue seeping out from behind the cords, as glue spots are very difficult, if not impossible to remove.
Side note on glue spots: if you do get a small amount of glue somewhere you don’t want it, leave it alone to dry. Don’t be tempted to rub it off, as this will just rub it into the fibers. Once it’s mostly dried, I’ll use a pin or needle to gently scrape it off as best as I can.

Repeat for the second loop:

And finally, the third. Don’t glue the free ends down to the beginning of the cord just yet.
I should also note that I’m working on both sides at the same time. While one’s drying I can work on the other, and it helps me keep everything even.
Annnd in hindsight I should have made these loops smaller. Oh well! 😅

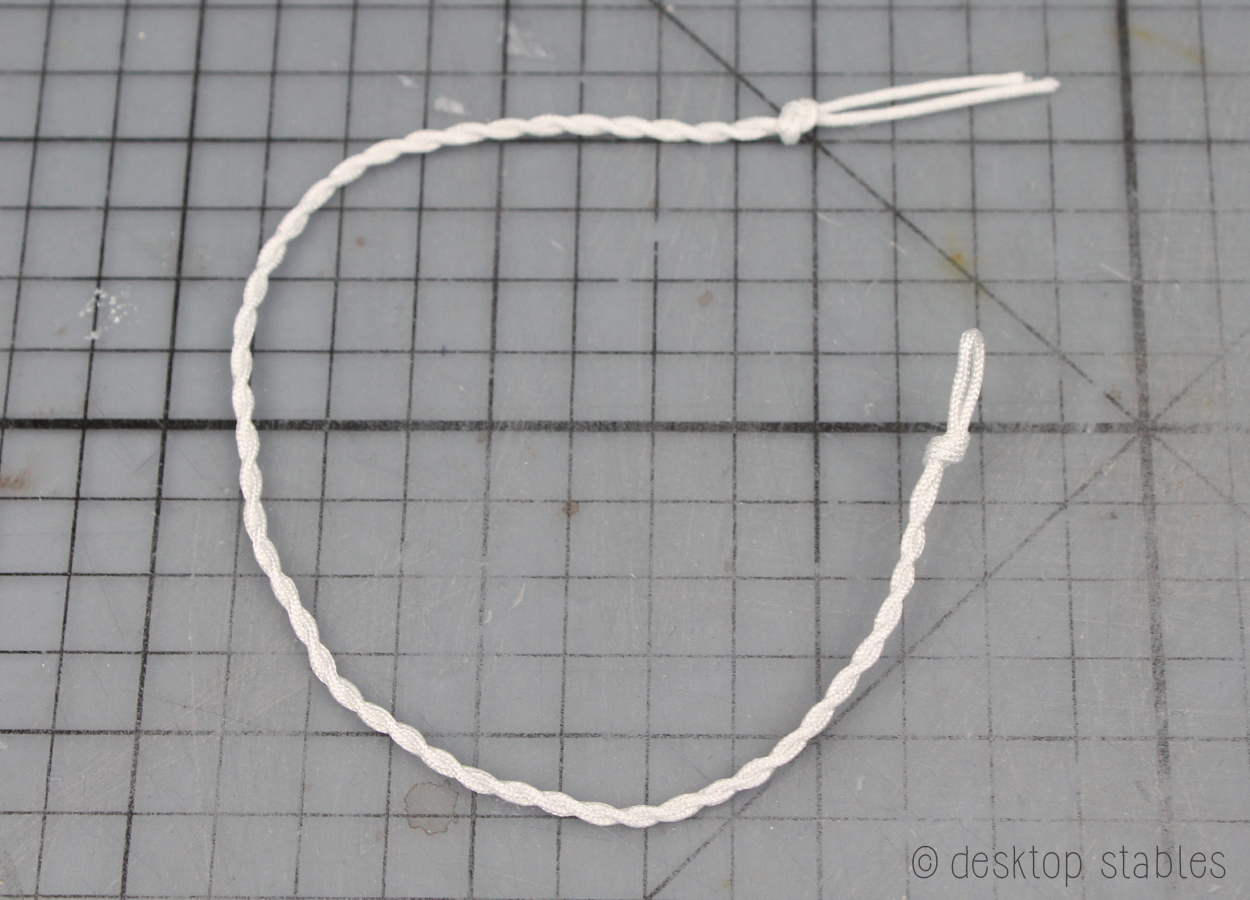
Next I’m going to make the tail cord. I want this to be about 4 – 4 1/2 inches long. I cut one cord about 17 inches long, folded it in half and twisted it together. This is the same way I make lead ropes, found in this tutorial. Set aside for now.
For the braids, cut three pieces of cord, each about 10 inches long. Find the center and slip them underneath the loop. On the loop, I trim off the excess and glue the ends down, making sure there’s space for the braid cords.

Split your cords into three bunches, (1 will cross over to the opposite side) then start braiding. Try to keep the cords laying flat and not twisting around each other.
Braid almost down to the end.

Next comes the tail cord. You can adjust the final length of this piece before or after you add it to the braid. In this case, I adjusted it afterward.
Braid around the cord, securing it in place. You can also gently open up one of the braids and push it through, then re-tighten the braid.
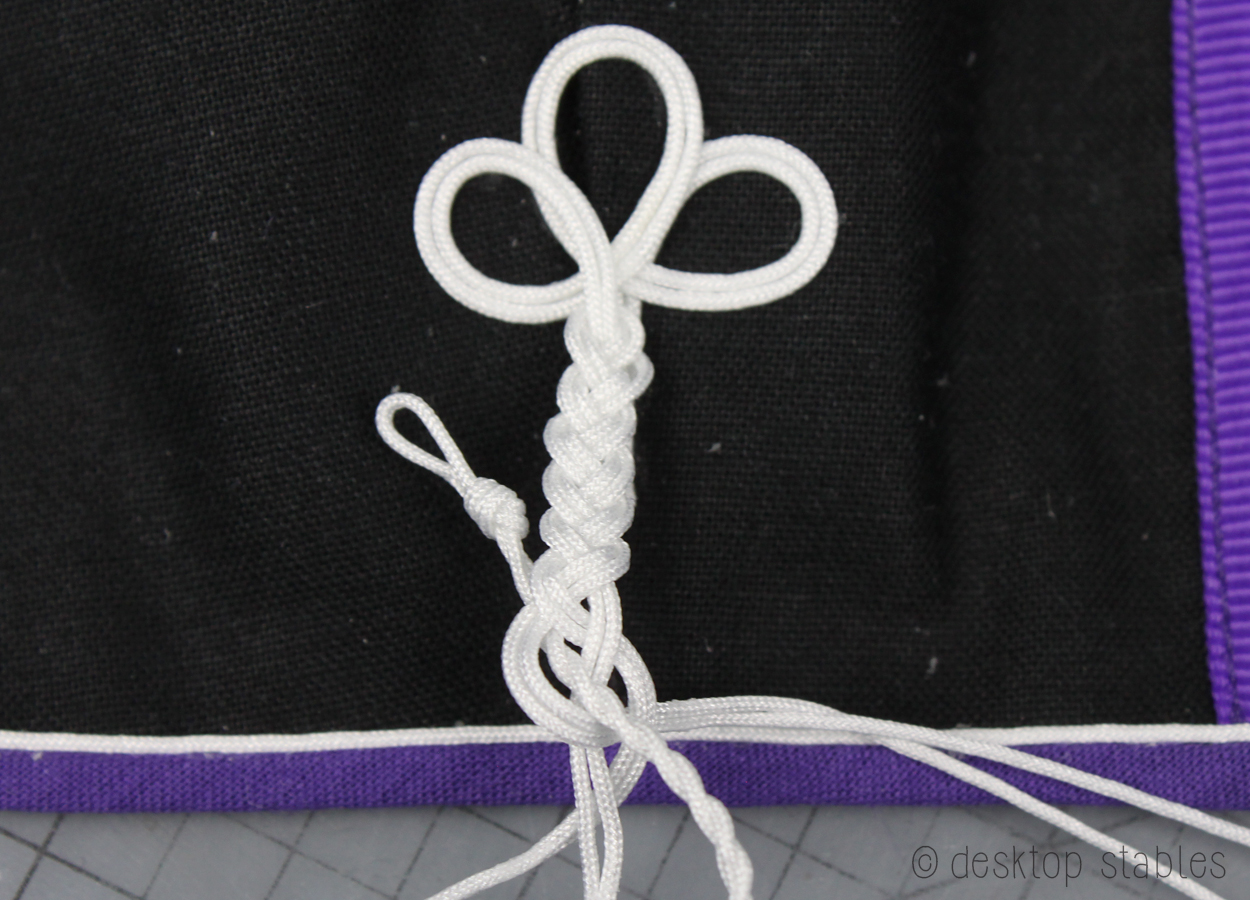
Here’s how it should look. Continue braiding past the end of the blanket, then secure the braid with glue to keep it from coming undone.
Repeat on the other side with the free end of the tail cord.
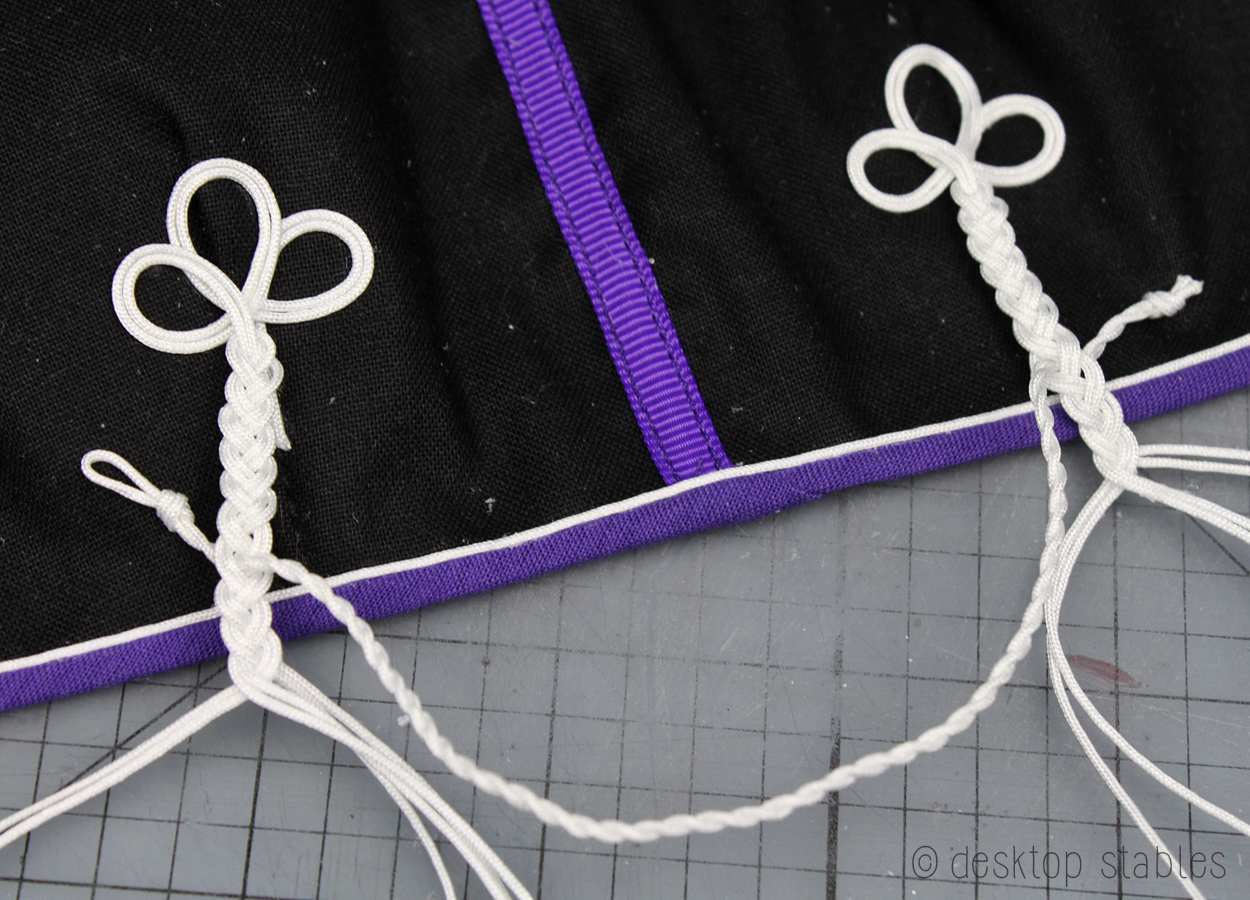
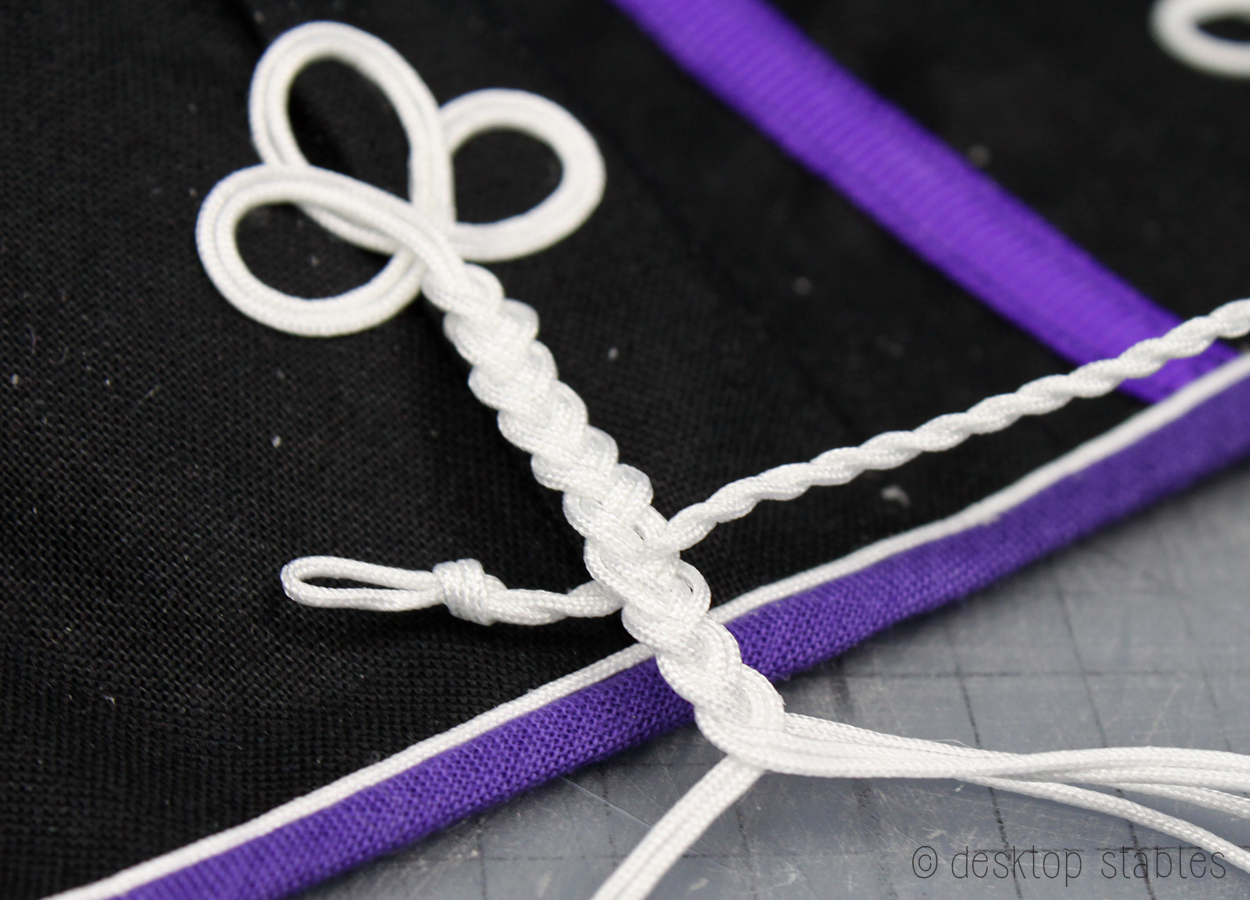
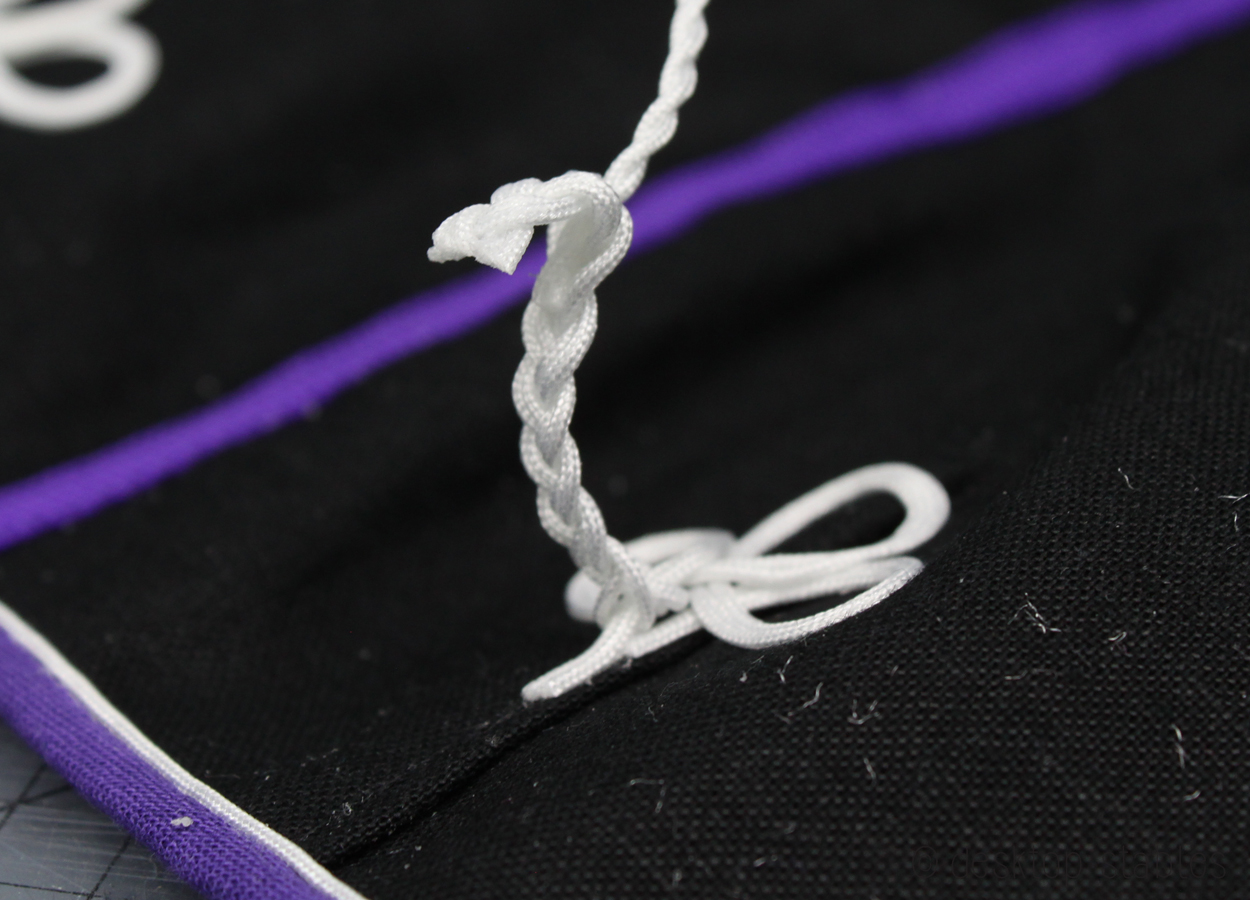
Once I’ve adjusted the tail cord to the length I want, (about 4 – 4 1/2 inches long) I’ll tie a knot in the cord. I’ll secure the twists by the knot with a generous amount of glue, then let dry.

The knot is bulky, so I’ll cut it off. Adding the glue beforehand helps keep the cord from untwisting itself. Secure underneath the braid, with the cut end pointed toward the loop.
Repeat on the other side.

Apply another generous amount of glue to the end of the braid, let dry and cut it off. Again, this is just to hold the cords in place.
Fold the braid end underneath and glue in place.
Lastly, glue the entire braid down to the blanket, and the hip ornaments are complete!

I hope some of you found this helpful, and feel free to ask if you have any questions!

Thank you for this awesome tutorial! I have been wondering how to make these for a while now!
Thank you SO much!! now I just have to figure out how to make the actual sheet and we’ll be good to go 😅 I love your tutorials, you make the steps so clear! Its the one thing I don’t like about a lot of tutorials but your’s are GREAT. One question, where did you find the patterns for your blankets? I have been looking everywhere for one and just can’t find a good one. Thanks!
Thanks!! I make the patterns myself. They basically look like a rectangle with a deep U cut out of one end, and from there I’ll add darts and seams to better shape it to the horse. Pattern making is a lot of trial and error!
Yup, pattern making does take a lot of trial and error lol, I’ve had to make patterns for saddle blankets and other small tack but I was hoping I could find an already made one for blankets. Thanks for the tip though!! Maybe one day I’ll be able to figure it out 😊 Thanks 😀
Thanks so much, Now time for plan scale it down, I reckon with one strand I could get a Schleich scale, but probably not with a broken hand tho. Thanks aging
The braid is beautiful and so is the binding and stitching I can see on the blanket. You do lovely work!
Awesome tutorial!!! Random question. Do you still use Fabri-tac glue for fabric items?? I’ve been using hot glue and wanted to switch to something a bit stronger and that doesn’t dry “bulky”. Just curious what on you use!
Yup, I use Fabri-tac for fabric, ribbon, etc. I love it!
Thanks!
Wow! I want to do that! How about a blanket tutorial?
You have inspired me to make breyer stuff! Can you look up my blog artandfunstuff.wordpress.com
Pleeeeeeeeeeeeeeeeeeeeease give us a pattern! We need it Nichelle!!!!!! 🙃😀
I have the nidal wonder one hahahah!🤣