
Summer’s here, and so are the flies.
 While this really isn’t a problem for models, I find it fun to re-create stuff like this in miniature. 😛

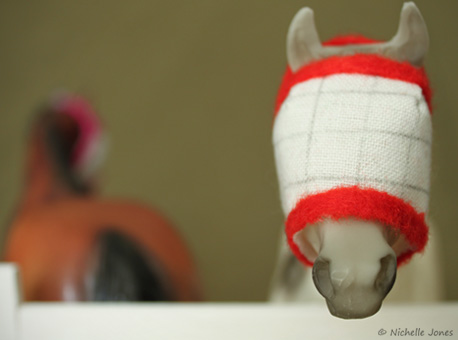 I’ve got another tutorial for you all today, if you’d like to make one of these yourself. 🙂 The pattern was made to fit a variety of models, but you may need to size it up or down for horses with large (or fine, like Eberl’s sculpts) heads.
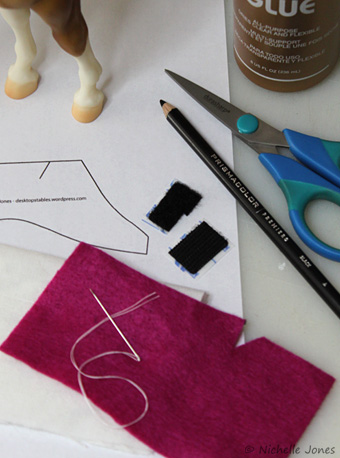 You’ll need:
- Fly Mask Pattern
- Fabric
- Felt (or trim of choice if you’d like)
- Velcro (can be found at Walmart or craft stores)
- Needle/thread to match fabric
- Scissors, glue, colored pencil (optional) and model to fit it to
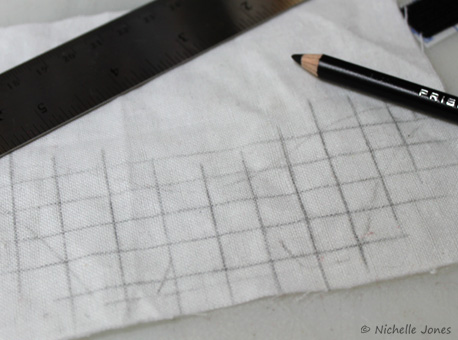
01: Trace pattern onto fabric
 02: I created a grid pattern on mine. This step is optional but it adds an extra touch of realism.
 03: Cut out – don’t worry about it being perfect as you can trim it later. Remember to cut the slits at the top!
 04: Flip the mask over. Pinch one of the slits together with the right side facing in. You’re going to want to stitch along the red line:
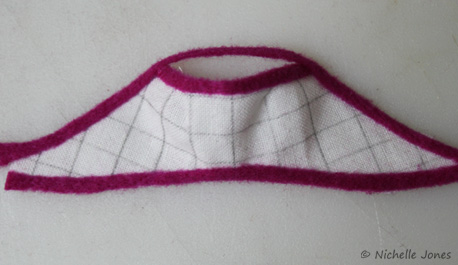
 05: Repeat for the other slit, and you should have something that looks like this:

 Checking the fit…
 06: To create the trim, I cut strips of felt 5 or 6 inches long. (it’s better to have more than not enough) Keep these thick as you’re going to stretch them out.
 07: Gently start stretching one of your strips. Some felt stretches really nicely while some breaks once you start. Expect to break lots! 😉 The idea is to make them nice and fuzzy. If your strips are still too thick after stretching, you can always trim them down to size.
 You want them to be around 1/8 wide.
 08: Run a line of glue along the bottom edge of the mask, and press one of the strips in place.
 09: Do the same for the top, then trim off the excess.
 10: Add another strip across the top, leaving a loop for the ears
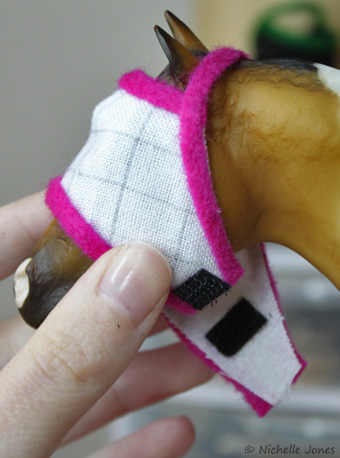
 11: Another fit check… now’s a good time to clean up any extra fuzz or fabric showing at the edges.
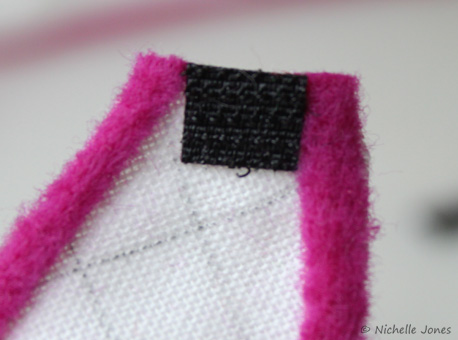
 12: To make the closure, I cut a small piece of velcro and placed it below the chin. Mine had a sticky back so I could stick it in place, but you may need to glue or sew yours. (it would be a good idea to sew it in place anyway) Unless you have thin velcro already, you can help reduce the bulk by trimming the pieces beforehand.
 Cut off the excess:
 13: Repeat for the other side, but make sure the velcro is on the “wrong” side of the fabric.
 One more trim… (I flipped it over and covered the edge with more felt too, but failed to get a photo of it)
 And your fly mask is complete!
 Hope you enjoy!
And what do you all think of the new banner? 🙂

Haha, those are awesome! I made one for my lot ages ago but I don’t know what happened to it so I may need to make some more now!
You’re always coming up with some pretty neat/fun accessories!
The attention to detail makes all the difference.
Thanks for sharing.
P.S. LOVE the new banner!!
That is adorable! I’ll have to make some soon!
Love the new banner!
adorable i love it! the banners great though! (personaly I think the old one was cuter)
I just made one of these today for my Alborozo. The grid is blue and the felt trim is red to match his WEG blanket. However, I did deviate from the tutorial a bit. Firstly, I made my felt strips a bit wider to they could be folded over, like bias, because the fabric I used has a tendency to fray like crazy. Also, I shortened the botto of the mask and attached 1/8th inch elastic crisscrossing from corner to corner because of his tucked head.
Thanks so much for the tutorial, I hope to make some more for my “fussy” models! 🙂
Awesome! I’m glad you like it. 😀
I don’t get the part about the slits and stitching them…?
How so? You don’t have to cut the slits and stitch them, it just makes a better fit on the horse. 🙂
These fly masks are so fun and easy! My heard won’t be bothered by the flies this summer! LOL I have done a few variations and it’s been a blast. Winter is not so boring with your fun tutorials~ Thank you! Happy trails……….. Deb in Spokane.
Your pattern file is a pdf, and I can’t seem to change it into any other type of file. I am very disappointed.
What kind of file do you need?
Love it! Super easy! Looks professional and my models love it. 🙂
Also, what kind of glue do you use? I’m not sure what would work the best.
I used Aleene’s Tacky Glue, but a fabric glue would work well too. 🙂
What kind of fabric did you use?
They were made with a soft cotton fabric… I’m not entirely sure what it is as I’ve had it for ages! 🙂
Thank you!!!
I think this is SO cool! Just finished making this, in January! LOL, no flies around now!
Awesome, glad you enjoyed it! 🙂
Can’t copy fly mask pattern with out save it
Could you make a tutorial on fly spray? I love everything you do!
It’s not a tutorial, but I do have a printable label for fly spray in this post: https://desktopstables.com/2016/04/24/mini-bathing-supplies/
The bottle was sculpted from polymer clay. I cut the shape of the nozzle from a flattened piece of clay, then stuck it to the top of the bottle before baking. It was quite fiddly to make!
Cool thanks!
These are adorable!
Thanks for showing how to make it!
I LOVE this this is a good idea
so good
:0
I’m not a Breyer girl I’m a schleich girl but this fly mask is awesome I wish I was that good…….
I absolutely LOVE Breyer models, this tutorial is so detailed and amazing!
Really nice, I am making one more like this:
(Just in grey with stars on it!)
Just picture a real horse fly mask with fabric and netting, it won’t let me put a picture on!😆
Can you please put some of your accessories you make for sale so like we can order some? I don’t have the materials and other people might not either so we might not be able to get any of this stuff